Hole Viewer
Skip to Hole
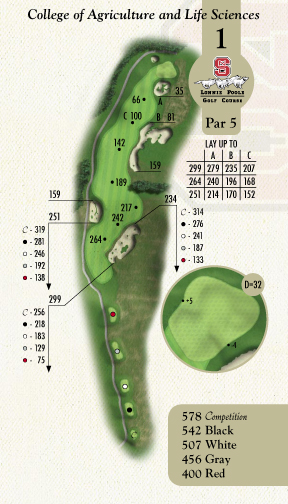
Hole 1, College of Agriculture and Life Sciences
Par 5
Distance
| Tee | Distance |
|---|---|
| · Competition | 578 yards |
| · Black | 542 yards |
| · White | 507 yards |
| · Gray | 456 yards |
| · Red | 400 yards |
Hole Overview
Description
Many golf courses start out with an easy hole, one that provides a smooth transition from the driving range to the first tee. But the Lonnie Poole Golf Course isn’t one of them. The large sloping native bunker on the right side of the fairway forces the player to hit their tee shot up the left side. Driving it in the bunker is a mistake you don’t want to make. The second shot also should be played up the left side of the fairway to about 100 yards where the undulating fairway levels out for a flat shot into the green. Stay away from the right side the entire length of the hole and don’t let your approach shot carry over the green. It falls off sharply.
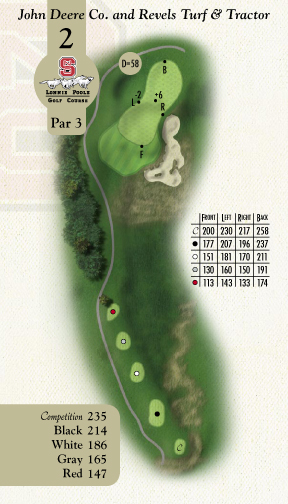
Hole 2, John Deere Co. and Revels Turf & Tractor
Par 3
Distance
| Tee | Distance |
|---|---|
| · Competition | 235 yards |
| · Black | 214 yards |
| · White | 186 yards |
| · Gray | 165 yards |
| · Red | 147 yards |
Hole Overview
Description
The second hole doesn’t give much a of a reprieve. This long par 3 sports an enormous native bunker protecting the front right side of the green. So play left and let the slope feed the ball to the putting surface. The green is quite an achievement. It is the largest green on the golf course and has two distinct levels. What makes it so interesting is that the upper tier is in the front half of the green. This aids the player in running a shot to the flagstick when the pin is cut in the back. Distance control will be critical in avoiding the dreaded three or even four-putt.
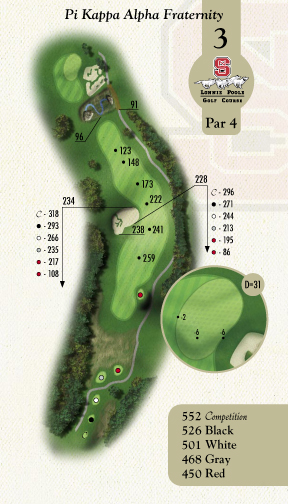
Hole 3, Pi Kappa Alpha Fraternity
Par 5, Par 4 in NCAA Men’s Golf Competitions
Distance
| Tee | Distance |
|---|---|
| · Competition | 552 yards |
| · Black | 526 yards |
| · White | 501 yards |
| · Gray | 468 yards |
| · Red | 450 yards |
Hole Overview
Description
The third hole is the #1 handicap hole and is a monster. This uphill dog-leg left is protected by an expansive natural bunker on the left side of the fairway and a forced carry native area and immense bunker upon your approach. The best strategy is to take what the hole gives you. Lay up on your second shot if necessary and try to get up and down for par. Bailing out long and left on your approach to the green leaves a reasonable up and down opportunity. Avoid the big number on this hole, and consider yourself off to a good start. Best of luck!
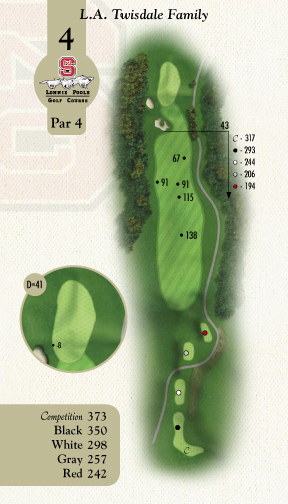
Hole 4, L.A. Twisdale Family
Par 4
Distance
| Tee | Distance |
|---|---|
| · Competition | 373 yards |
| · Black | 350 yards |
| · White | 298 yards |
| · Gray | 257 yards |
| · Red | 242 yards |
Hole Overview
Description
Ahhh!!! The fourth hole grants an opportunity to get one back that you gave up on the first three holes. But don’t let this short downhill hole fool you. If you get too aggressive with your tee shot, you just might have to wedge out of the trees as the fairway narrows substantially as you approach the green. Consider driving your tee shot to a comfortable yardage and then fire at the pin. This green has very subtle breaks, so study from all sides before stroking your putt.
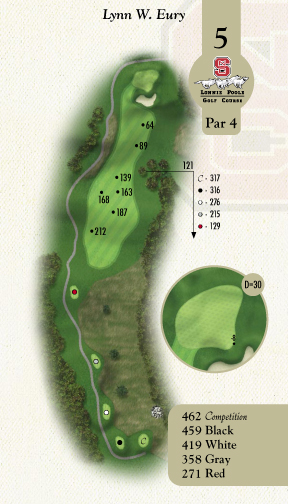
Hole 5, Lynn W. Eury
Par 4
Distance
| Tee | Distance |
|---|---|
| · Competition | 462 yards |
| · Black | 459 yards |
| · White | 419 yards |
| · Gray | 358 yards |
| · Red | 271 yards |
Hole Overview
Description
A dogleg right, number 5 requires a quality tee shot. The landing area is uphill and obstructed from the teeing ground, so drive it down the left center of the fairway. Although the fairway is very wide, the further right you drive it, the greater the chance to be blocked out by a line of tall trees on your approach shot. The green is protected on the right side by a native bunker, so favor the left side with your approach. Chipping and pitching from the left side of the green will give you a good chance to get the ball up and in.
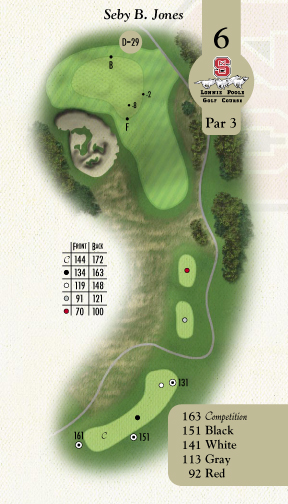
Hole 6, Seby B. Jones
Par 3
Distance
| Tee | Distance |
|---|---|
| · Competition | 163 yards |
| · Black | 151 yards |
| · White | 141 yards |
| · Gray | 113 yards |
| · Red | 92 yards |
Hole Overview
Description
This short, uphill par 3 features one of the more terrifying bunkers on the front nine. Make sure to consider the elevation change and prevailing headwind on the approach. It is always blowing harder than you can feel from the tee box. Presenting a large green with a false front on the front right side, over-clubbing will never hurt you as much as under-clubbing on number six. Leaving your approach in the bunker is a mistake you will certainly regret.
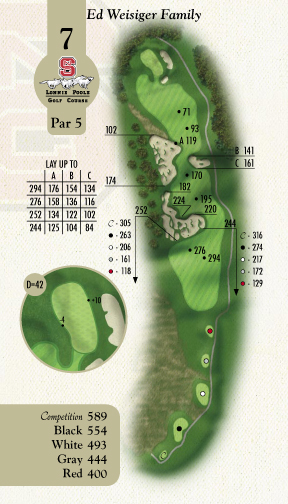
Hole 7, Ed Weisiger Family
Par 5
Distance
| Tee | Distance |
|---|---|
| · Competition | 589 yards |
| · Black | 554 yards |
| · White | 493 yards |
| · Gray | 444 yards |
| · Red | 400 yards |
Hole Overview
Description
The seventh hole is a great par 5. It combines the need for distance and accuracy flawlessly. Well-placed native bunkers demand smart shot-making from tee to green. Be as aggressive as you want or play it safe. Either way, this hole can yield some birdies. The second shot is the key to success on number 7. The aggressive player will try to blast a fairway metal or hybrid over the bunkers hoping for a hard release down to the green. But, be careful. There is a collection area left of the green and a bunker on the right. With a green that falls off on many sides, short pitches and chip shots will present quite a challenge. From the teeing ground, you get your first glimpse of downtown Raleigh.
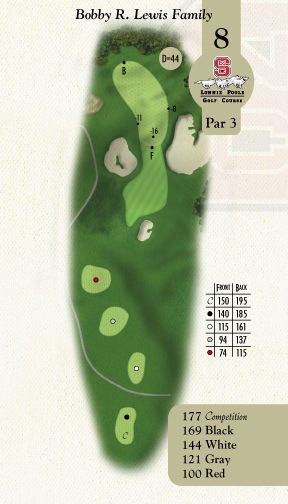
Hole 8, Bobby R. Lewis Family
Par 3
Distance
| Tee | Distance |
|---|---|
| · Competition | 177 yards |
| · Black | 169 yards |
| · White | 144 yards |
| · Gray | 121 yards |
| · Red | 100 yards |
Hole Overview
Description
The eighth hole is an uphill par 3 with a very large pitched green. As one of the more well-bunkered holes on the golf course, the green is actually not positioned as you would think. When surveying from the teeing ground, the putting surface appears to be centered between the native bunkers, but in reality it winds uphill and to the left leaving a sharp fall off if you miss the green. Because of the depth of the green, choosing the correct club is critical. Finding one of the front bunkers will leave a very long, difficult sand shot. A miss to the right leaves a manageable up and down.
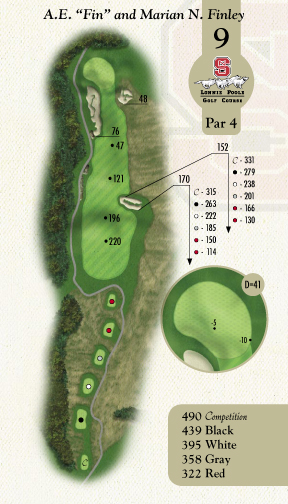
Hole 9, A.E. “Fin” and Marian N. Finley
Par 4
Distance
| Tee | Distance |
|---|---|
| · Competition | 490 yards |
| · Black | 439 yards |
| · White | 395 yards |
| · Gray | 358 yards |
| · Red | 322 yards |
Hole Overview
Description
The final hole of the front nine requires a very precise tee shot. With a bunker on the right, the fairway angles slightly to the left towards the hazard across the cart trail. Once you find the fairway, the trouble doesn’t end. The deep green is guarded on the left and right by lengthy native bunkers. However if you carry the bunker on the right, your ball will feed and find the putting surface. Watch your first putt, it may get away from you on this very undulated green.
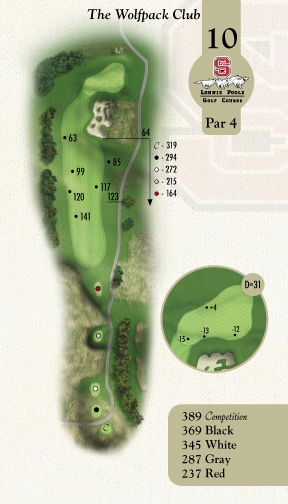
Hole 10, The Wolfpack Club
Par 4
Distance
| Tee | Distance |
|---|---|
| · Competition | 389 yards |
| · Black | 369 yards |
| · White | 345 yards |
| · Gray | 287 yards |
| · Red | 237 yards |
Hole Overview
Description
The tenth hole is a short par 4 requiring a tee shot down the left side of the fairway which grades sharply to the right. It is recommended to drive the ball to a comfortable approach distance in order to achieve the best chance of getting your second shot close to the hole. The climbing approach is protected by a magnificent but ominous bunker. Avoid the sand at all costs; you don’t want to leave your ball in the bunker or on one of the many fingers and islands of tall native grass. With a very large subtly breaking green, distance control on the approach is essential. There is a backstop in the back right portion of the green to help you zip one back when the pin is tucked.
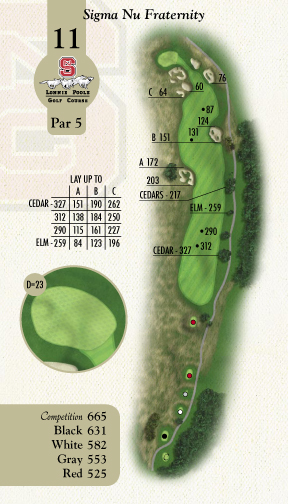
Hole 11, Sigma Nu Fraternity
Par 5
Distance
| Tee | Distance |
|---|---|
| · Competition | 665 yards |
| · Black | 631 yards |
| · White | 582 yards |
| · Gray | 553 yards |
| · Red | 525 yards |
Hole Overview
Description
Don’t get sidetracked by the spectacular view of downtown Raleigh on this long par 5 or you will end up making a big number. The tee shot on number 11 is the least of your worries; perfect placement of your second shot should be your goal. There are several bunkers safeguarding the rising approach from 150 yards in. Distance control will suit you well approaching the small green because short, long, left and right are all defended by bunkers and native grasses. From tee to green, the hole accords the greatest views and sights on the golf course and its surroundings including: the view of downtown, Centennial Campus, the Bell Tower and the Smokestack. As the signature hole, the design concept really shines through, leaving the player with the impression that the course was just cut out of the hillside from high point to high point.
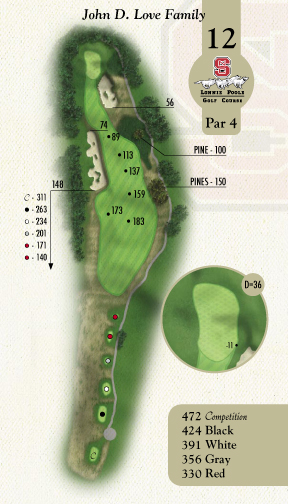
Hole 12, John D. Love Family
Par 4
Distance
| Tee | Distance |
|---|---|
| · Competition | 472 yards |
| · Black | 424 yards |
| · White | 391 yards |
| · Gray | 356 yards |
| · Red | 330 yards |
Hole Overview
Description
The downhill tee shot on #12 looks dramatic as the ball fades through the downtown skyline settling next to the harshly slanted large native bunker nestled on the left side of the fairway. This is another fairway that narrows significantly the closer you get to the green. So, a layup to the perfect yardage off the tee is definitely a smart option. The green is deep but not very wide. Accuracy on your approach is a must as there is no bailout left or right.
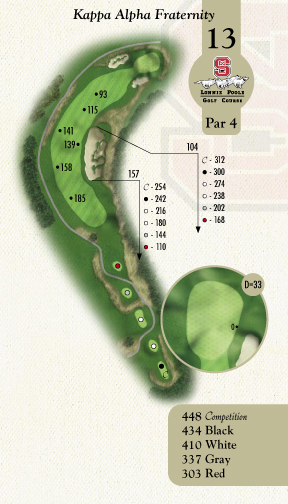
Hole 13, Kappa Alpha Fraternity
Par 4
Distance
| Tee | Distance |
|---|---|
| · Competition | 448 yards |
| · Black | 434 yards |
| · White | 410 yards |
| · Gray | 337 yards |
| · Red | 303 yards |
Hole Overview
Description
The tee shot is vital on number 13. This uphill dog-leg right isn’t the longest hole on the course, but it presents the most treacherous native fairway bunker to navigate on the entire course. Keep left off the tee at all costs. If you find the steep jagged fairway bunker with your drive, take your medicine and play back to the fairway to avoid a big number. And if your tee ball finds the fairway, be aware of your stance during your short approach shot, as the fairway tilts considerably. Do not hit long with your approach, you will not relish your uphill recovery shot from the deep native grass behind the green.
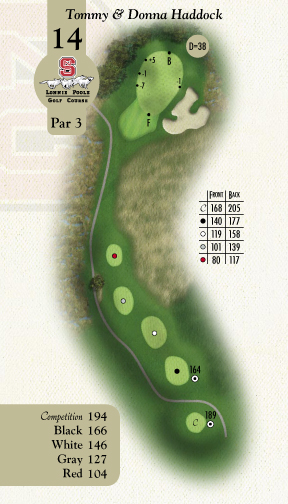
Hole 14, Tommy and Donna Haddock
Par 3
Distance
| Tee | Distance |
|---|---|
| · Competition | 194 yards |
| · Black | 166 yards |
| · White | 146 yards |
| · Gray | 127 yards |
| · Red | 104 yards |
Hole Overview
Description
This par 3 has the most dramatic green on the entire course. Distance and accuracy are both critical for success. Although the bunker right of the green is daunting, the left side slopes severely into the hazard. Short of the green is not a bad miss. Once you come to rest on the green, first settle yourself by looking back towards the tee at the stunning view of the hillsides of #16 and #18, then take a deep breath and settle for a 2-putt. The ball will certainly have a tendency to get away from you if you’re not conscious of the many twists and turns on the putting surface.
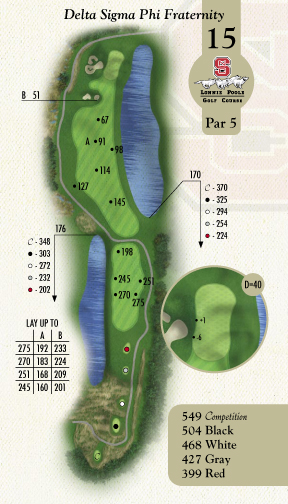
Hole 15, Delta Sigma Phi Fraternity
Par 5
Distance
| Tee | Distance |
|---|---|
| · Competition | 549 yards |
| · Black | 504 yards |
| · White | 468 yards |
| · Gray | 427 yards |
| · Red | 399 yards |
Hole Overview
Description
This par 5 is a remarkable risk-reward hole. Both the aggressive and the conservative player have a great opportunity to achieve success on the fifteenth hole. With water left off the tee, the tendency will be to bang it down the right side. But be careful, the fairway ends abruptly and the tree-line will swallow as many drives as the water. The water short and right of the green may force some to lay up on their second shot, but if firing at pins is your game, grab your fairway metal or hybrid and let it rip. But be aware, the green is very small and nestled between the water and several small bunkers. So an aggressive play can turn into a double-bogey very quickly. When laying up, there is more room than you think on the left side, so take advantage of the best approach angle for your third shot.
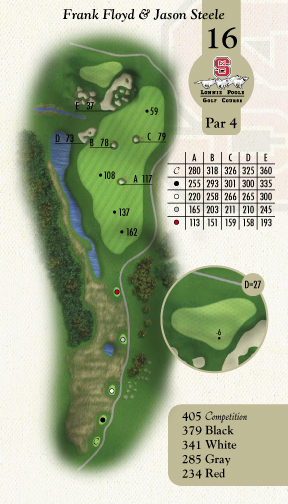
Hole 16, Frank Floyd and Jason Steele
Par 4
Distance
| Tee | Distance |
|---|---|
| · Competition | 405 yards |
| · Black | 379 yards |
| · White | 341 yards |
| · Gray | 285 yards |
| · Red | 234 yards |
Hole Overview
Description
The most striking views on the golf course are seen from number 16 teeing ground. From this high vantage point, you can see 5 greens on the golf course. And the flowing fescue grasses on the hillsides are extraordinary. The three small pot bunkers down the right side of the fairway are imposing. But let not your heart be troubled, they are actually much further apart than they seem. A choice must be made off the tee; left, right bomb it or lay it up? Whatever shot you are the most comfortable with is the one you should play here. But, take heed of the wind conditions. From this high point, your ball will be affected all the way to the ground and throughout the length of the hole by the prevailing crosswinds. The green is huge and nuzzled into the hillside surrounded by a menacing bunker and native grasses.
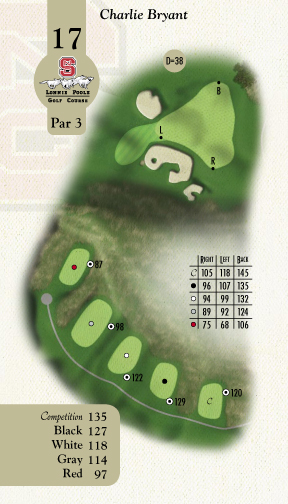
Hole 17, Charlie Bryant
Par 3
Distance
| Tee | Distance |
|---|---|
| · Competition | 135 yards |
| · Black | 127 yards |
| · White | 118 yards |
| · Gray | 114 yards |
| · Red | 97 yards |
Hole Overview
Description
All golfers love a short par 3. But don’t let this little guy fool you. The prevailing headwinds and elevation change will bring many players to their knees. The stair-step tee boxes are a unique feature that set the forward tees at the high point and the championship tees at the low point. The large green slants from left to right and falls off steeply on the right side. Missing left of the green will enable the ball to carom off the hill and onto the putting surface. Remember to factor in the slope on your pitch and chip shots and make sure you read the up and downhill putts correctly. It just may be the difference between a smile on your face and a broken putter.
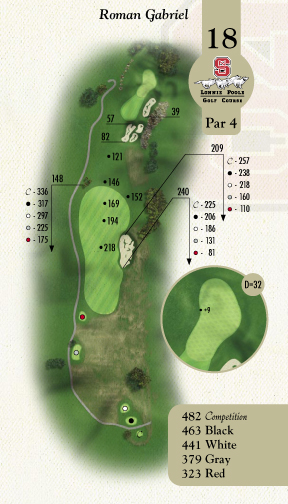
Hole 18, Roman Gabriel
Par 4
Distance
| Tee | Distance |
|---|---|
| · Competition | 482 yards |
| · Black | 463 yards |
| · White | 441 yards |
| · Gray | 379 yards |
| · Red | 323 yards |
Hole Overview
Description
The homeward hole is not only one of the most challenging holes on the course, it is one of the toughest finishing holes in the Carolina’s. The tee shot requires a keen sense of how the crosswinds will affect your ball flight. The right side of the hole is big trouble the entire length of the hole. Your tee shot should be placed down the left center of the fairway, avoiding the fairway bunker and abrupt slope on the right side of the fairway. However, if you over-cook your ball too far down the left side, a small grove of tall trees will leave your approach shot blocked out. After finding the fairway, the fun now begins. The length of the approach shot and the prevailing left to right wind will seem to make it impossible. The bunkers and vertical native bank on the right side of the green will intimidate even the most seasoned golfer. But, keep your chin up, there is a bright side. Keeping the ball left on your approach will funnel it onto the putting surface to a gently sloped green which will yield many holed putts. Left, short and a bit long are all good misses on #18. Anything but right!
